
10.2 组合现有组件
在Flutter中页面UI通常都是由一些低阶别的组件组合而成,当我们需要封装一些通用组件时,应该首先考虑是否可以通过组合其它组件来实现,如果可以,则应优先使用组合,因为直接通过现有组件拼装会非常简单、灵活、高效。
示例:自定义渐变按钮
Flutter Material组件库中的按钮默认不支持渐变背景,为了实现渐变背景按钮,我们自定义一个GradientButton组件,它需要支持一下功能:
- 背景支持渐变色
- 手指按下时有涟漪效果
- 可以支持圆角
我们先来看看最终要实现的效果(图10-1):
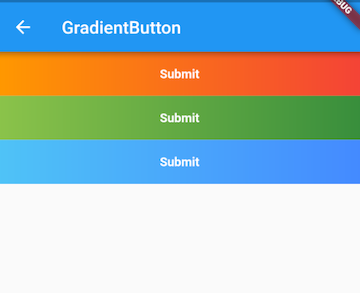
我们DecoratedBox可以支持背景色渐变和圆角,InkWell在手指按下有涟漪效果,所以我们可以通过组合DecoratedBox和InkWell来实现GradientButton,代码如下:
1import 'package:flutter/material.dart';
2
3class GradientButton extends StatelessWidget {
4 GradientButton({
5 this.colors,
6 this.width,
7 this.height,
8 this.onPressed,
9 this.borderRadius,
10 this.child,
11 });
12
13 // 渐变色数组
14 final List<Color> colors;
15
16 // 按钮宽高
17 final double width;
18 final double height;
19
20 final Widget child;
21 final BorderRadius borderRadius;
22
23 //点击回调
24 final GestureTapCallback onPressed;
25
26
27 Widget build(BuildContext context) {
28 ThemeData theme = Theme.of(context);
29
30 //确保colors数组不空
31 List<Color> _colors = colors ??
32 [theme.primaryColor, theme.primaryColorDark ?? theme.primaryColor];
33
34 return DecoratedBox(
35 decoration: BoxDecoration(
36 gradient: LinearGradient(colors: _colors),
37 borderRadius: borderRadius,
38 ),
39 child: Material(
40 type: MaterialType.transparency,
41 child: InkWell(
42 splashColor: _colors.last,
43 highlightColor: Colors.transparent,
44 borderRadius: borderRadius,
45 onTap: onPressed,
46 child: ConstrainedBox(
47 constraints: BoxConstraints.tightFor(height: height, width: width),
48 child: Center(
49 child: Padding(
50 padding: const EdgeInsets.all(8.0),
51 child: DefaultTextStyle(
52 style: TextStyle(fontWeight: FontWeight.bold),
53 child: child,
54 ),
55 ),
56 ),
57 ),
58 ),
59 ),
60 );
61 }
62}可以看到GradientButton是由DecoratedBox、Padding、Center、InkWell等组件组合而成。当然上面的代码只是一个示例,作为一个按钮它还并不完整,比如没有禁用状态,读者可以根据实际需要来完善。
使用GradientButton
1import 'package:flutter/material.dart';
2import '../widgets/index.dart';
3
4class GradientButtonRoute extends StatefulWidget {
5
6 _GradientButtonRouteState createState() => _GradientButtonRouteState();
7}
8
9class _GradientButtonRouteState extends State<GradientButtonRoute> {
10
11 Widget build(BuildContext context) {
12 return Container(
13 child: Column(
14 children: <Widget>[
15 GradientButton(
16 colors: [Colors.orange, Colors.red],
17 height: 50.0,
18 child: Text("Submit"),
19 onPressed: onTap,
20 ),
21 GradientButton(
22 height: 50.0,
23 colors: [Colors.lightGreen, Colors.green[700]],
24 child: Text("Submit"),
25 onPressed: onTap,
26 ),
27 GradientButton(
28 height: 50.0,
29 colors: [Colors.lightBlue[300], Colors.blueAccent],
30 child: Text("Submit"),
31 onPressed: onTap,
32 ),
33 ],
34 ),
35 );
36 }
37 onTap() {
38 print("button click");
39 }
40}总结
通过组合的方式定义组件和我们之前写界面并无差异,不过在抽离出单独的组件时我们要考虑代码规范性,如必要参数要用@required 标注,对于可选参数在特定场景需要判空或设置默认值等。这是由于使用者大多时候可能不了解组件的内部细节,所以为了保证代码健壮性,我们需要在用户错误地使用组件时能够兼容或报错提示(使用assert断言函数)。