10.6 自绘组件:CustomCheckbox
Flutter 自带的 Checkbox 组件是不能自由指定大小的,本节我们通过自定义一个可以自由指定大小的 CustomCheckbox 组件来演示如何通过定义 RenderObject 的方式来自定义组件(而不是通过组合)。
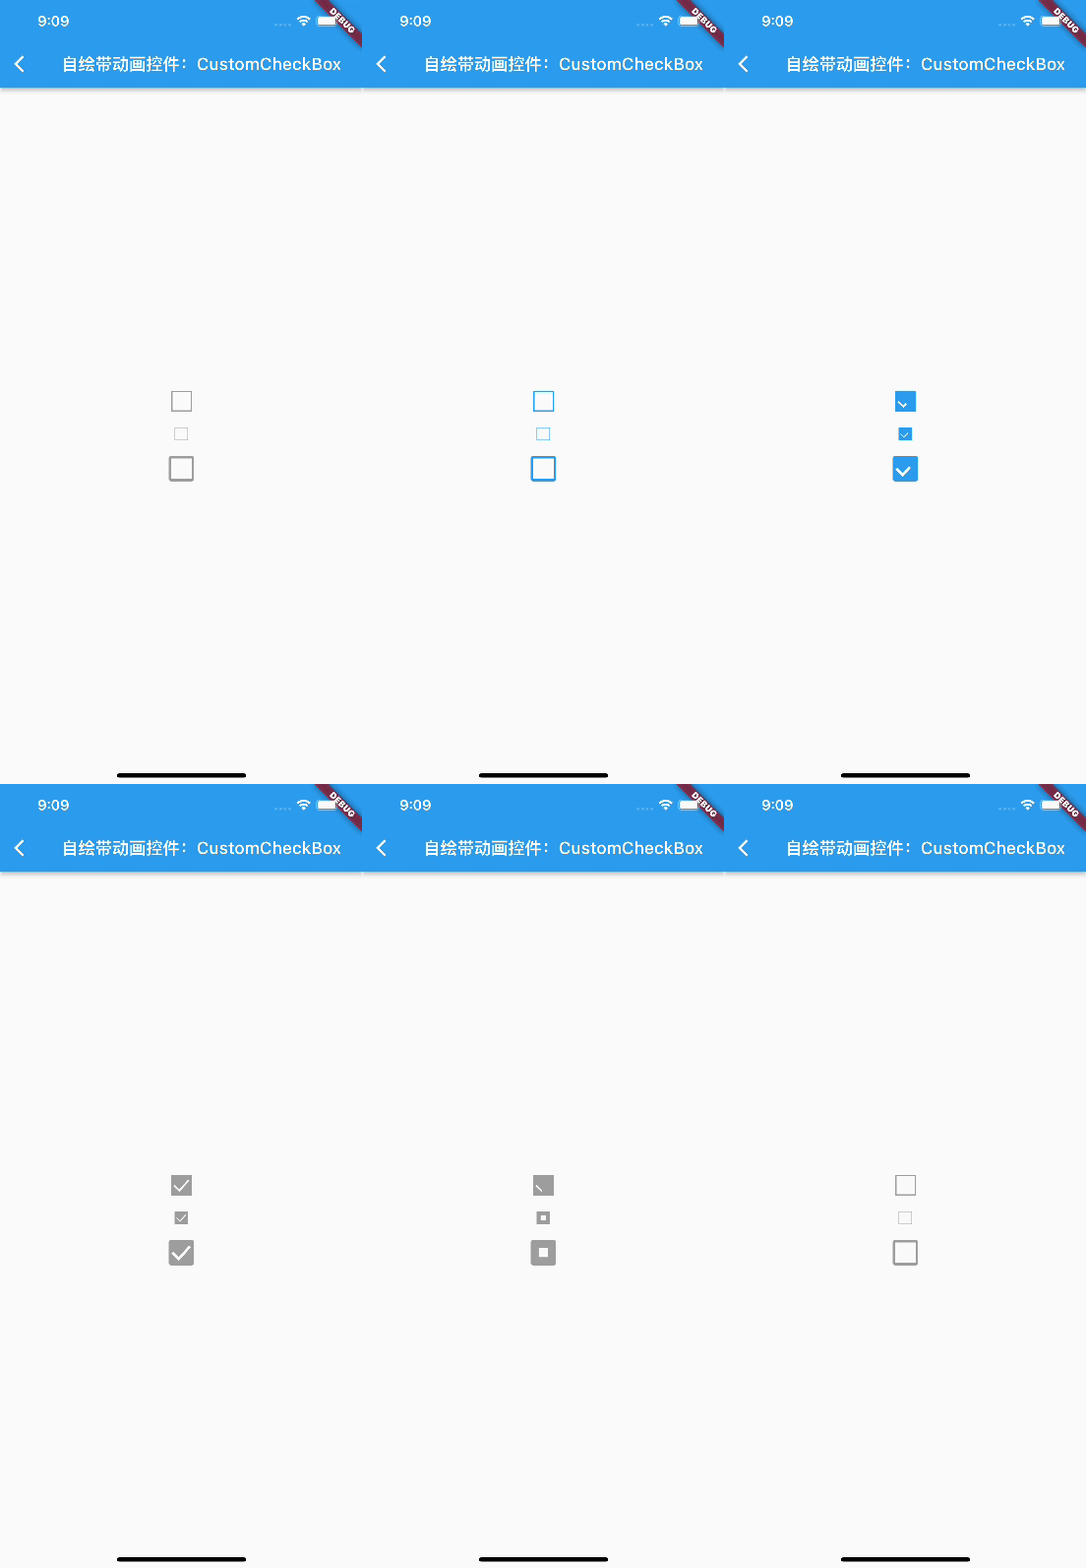
- 有选中和未选中两种状态。
- 状态切换时要执行动画。
- 可以自定义外观。
CustomCheckbox 定义如下:
1class CustomCheckbox extends LeafRenderObjectWidget {
2 CustomCheckbox({
3 Key? key,
4 this.strokeWidth = 2.0,
5 this.value = false,
6 this.strokeColor = Colors.white,
7 this.fillColor = Colors.blue,
8 this.radius = 2.0,
9 this.onChanged,
10 }) : super(key: key);
11
12 final double strokeWidth; // “勾”的线条宽度
13 final Color strokeColor; // “勾”的线条宽度
14 final Color? fillColor; // 背景填充颜色
15 final bool value; //选中状态
16 final double radius; // 圆角
17 final ValueChanged<bool>? onChanged; // 选中状态发生改变后的回调
18
19
20 RenderObject createRenderObject(BuildContext context) {
21 return RenderCustomCheckbox(
22 strokeWidth,
23 strokeColor,
24 fillColor ?? Theme.of(context).primaryColor, // 填充颜色如果未指定则使用主题色
25 value,
26 radius,
27 onChanged,
28 );
29 }
30
31
32 void updateRenderObject(context, RenderCustomCheckbox renderObject) {
33 if (renderObject.value != value) {
34 //选中状态发生了变化,则需要调整动画状态以执行过渡动画
35 renderObject.animationStatus =
36 value ? AnimationStatus.forward : AnimationStatus.reverse;
37 }
38 renderObject
39 ..strokeWidth = strokeWidth
40 ..strokeColor = strokeColor
41 ..fillColor = fillColor ?? Theme.of(context).primaryColor
42 ..radius = radius
43 ..value = value
44 ..onChanged = onChanged;
45 }
46}上面代码中唯一需要注意的就是 updateRenderObject 方法中当选中状态发生变化时,我们要更新RenderObject中的动画状态,具体逻辑是:当从未选中切换为选中状态时,执行正向动画;当从选中状态切换为未选中状态时执行反向动画。
接下来需要实现 RenderCustomCheckbox:
1class RenderCustomCheckbox extends RenderBox {
2 bool value;
3 int pointerId = -1;
4 double strokeWidth;
5 Color strokeColor;
6 Color fillColor;
7 double radius;
8 ValueChanged<bool>? onChanged;
9
10 // 下面的属性用于调度动画
11 double progress = 0; // 动画当前进度
12 int? _lastTimeStamp;//上一次绘制的时间
13 //动画执行时长
14 Duration get duration => const Duration(milliseconds: 150);
15 //动画当前状态
16 AnimationStatus _animationStatus = AnimationStatus.completed;
17 set animationStatus(AnimationStatus v) {
18 if (_animationStatus != v) {
19 markNeedsPaint();
20 }
21 _animationStatus = v;
22 }
23
24 //背景动画时长占比(背景动画要在前40%的时间内执行完毕,之后执行打勾动画)
25 final double bgAnimationInterval = .4;
26
27 RenderCustomCheckbox(this.strokeWidth, this.strokeColor, this.fillColor,
28 this.value, this.radius, this.onChanged)
29 : progress = value ? 1 : 0;
30
31
32 void performLayout() {} //布局
33
34
35 void paint(PaintingContext context, Offset offset) {
36 Rect rect = offset & size;
37 // 将绘制分为背景(矩形)和 前景(打勾)两部分,先画背景,再绘制'勾'
38 _drawBackground(context, rect);
39 _drawCheckMark(context, rect);
40 // 调度动画
41 _scheduleAnimation();
42 }
43
44 // 画背景
45 void _drawBackground(PaintingContext context, Rect rect) {}
46
47 //画 "勾"
48 void _drawCheckMark(PaintingContext context, Rect rect) { }
49 //调度动画
50 void _scheduleAnimation() {}
51
52 ... //响应点击事件
53}实现布局算法
为了使用户可以自定义宽高,我们的布局策略是:如果父组件指定了固定宽高,则使用父组件指定的,否则宽高默认置为 25:
1
2void performLayout() {
3 size = constraints.constrain(
4 constraints.isTight ? Size.infinite : Size(25, 25),
5 );
6}绘制 CustomCheckbox
记下来重点就是绘制 CustomCheckbox 了,为了清洗起见,我们将绘制分为背景(矩形)和 前景(打勾)两部分,先画背景,再绘制'勾',这里需要注意两点:
- 我们绘制的是动画执行过程中的一帧,所以需要通过动画执行的进度(progress)来计算每一帧要绘制的样子。
- 当 CustomCheckbox 从未选中变为选中时,我们执行正向动画,progress 的值会从 0 逐渐变为 1,因为 CustomCheckbox 的背景和前景('勾')的颜色要有对比,所以我们在背景绘制完之后再绘制前景。因此,我们将动画分割为两端,前 40% 的时间画背景,后 60%的时间画'勾'。
绘制背景
下面我们先看看如何绘制背景:
- 当状态切换为选中状态时,将矩形逐渐从边缘向中心收缩填充,直到填满 Checkbox 区域。
- 当状态切换为未选中状态时,填充从中间逐渐向边缘消散,直到只剩一个边框为止。
实现的思路是先将整个背景矩形区域全部填充满蓝色,然后在上面绘制一个白色背景的矩形,根据动画进度来动态改变白色矩形区域大小即可。幸运的是 Canvas API 中已经帮助我们实现了我们期望的功能,drawDRRect 他可以指定内外两个矩形,然后画出不相交的部分,并且可以指定圆角,下面是具体实现:
1void _drawBackground(PaintingContext context, Rect rect) {
2  Color color = value ? fillColor : Colors.grey;
3  var paint = Paint()
4    ..isAntiAlias = true
5    ..style = PaintingStyle.fill //填充
6    ..strokeWidth
7    ..color = color;
8
9  // 我们需要算出每一帧里面矩形的大小,为此我们可以直接根据矩形插值方法来确定里面矩形
10  final outer = RRect.fromRectXY(rect, radius, radius);
11  var rects = [
12    rect.inflate(-strokeWidth),
13    Rect.fromCenter(center: rect.center, width: 0, height: 0)
14  ];
15  // 根据动画执行进度调整来确定里面矩形在每一帧的大小
16  var rectProgress = Rect.lerp(
17    rects[0],
18    rects[1],
19    // 背景动画的执行时长是前 40% 的时间
20    min(progress, bgAnimationInterval) / bgAnimationInterval,
21  )!;
22  final inner = RRect.fromRectXY(rectProgress, 0, 0);
23  // 绘制
24  context.canvas.drawDRRect(outer, inner, paint);
25}
绘制前景
前景是一个"勾",它有三个点的连线构成,为了简单起见,我们将起始点和中点拐点的位置根据 Checkbox 的大小算出固定的坐标,然后我们在每一帧中动态调整第三个点的位置就可以实现打勾动画:
1//画 "勾"
2void _drawCheckMark(PaintingContext context, Rect rect) {
3  // 在画好背景后再画前景
4  if (progress > bgAnimationInterval) {
5
6    //确定中间拐点位置
7    final secondOffset = Offset(
8      rect.left + rect.width / 2.5,
9      rect.bottom - rect.height / 4,
10    );
11    // 第三个点的位置
12    final lastOffset = Offset(
13      rect.right - rect.width / 6,
14      rect.top + rect.height / 4,
15    );
16
17    // 我们只对第三个点的位置做插值
18    final _lastOffset = Offset.lerp(
19      secondOffset,
20      lastOffset,
21      (progress - bgAnimationInterval) / (1 - bgAnimationInterval),
22    )!;
23
24    // 将三个点连起来
25    final path = Path()
26      ..moveTo(rect.left + rect.width / 7, rect.top + rect.height / 2)
27      ..lineTo(secondOffset.dx, secondOffset.dy)
28      ..lineTo(_lastOffset.dx, _lastOffset.dy);
29
30    final paint = Paint()
31      ..isAntiAlias = true
32      ..style = PaintingStyle.stroke
33      ..color = strokeColor
34      ..strokeWidth = strokeWidth;
35
36    context.canvas.drawPath(path, paint..style = PaintingStyle.stroke);
37  }
38}
调度动画
最后,我们需要让UI动起来,这时我们回想一下前面动画一章中的内容,会意识到 Flutter 的动画框架是依赖于 StatefulWidget 的,即当状态改变时显式或隐式的去调用 setState 触发更新。但是我们直接通过定义 RenderObject 的方式来实现的 CustomCheckbox,并不是基于 StatefulWidget ,那该怎么来调度动画呢?有两种办法:
- 将 CustomCheckbox 用一个 StatefulWidget 包装起来,这样就可以复用之前介绍的执行动画的方法。
- 自定义动画调度。
第一种方法相信读者已经很熟悉了,不再赘述,下面我们演示一下第二种方法,我们的思路是:在一帧绘制结束后判断动画是否结束,如果动画未结束,则将将当前组件标记为”需要重绘“,然后等待下一帧即可:
1void _scheduleAnimation() {
2  if (_animationStatus != AnimationStatus.completed) {
3    // 需要在Flutter 当前frame 结束之前再执行,因为不能在绘制过程中又将组件标记为需要重绘
4    SchedulerBinding.instance!.addPostFrameCallback((Duration timeStamp) {
5      if (_lastTimeStamp != null) {
6        double delta = (timeStamp.inMilliseconds - _lastTimeStamp!) /
7          duration.inMilliseconds;
8        // 如果是反向动画,则 progress值要逐渐减小
9        if (_animationStatus == AnimationStatus.reverse) {
10          delta = -delta;
11        }
12        //更新动画进度
13        progress = progress + delta;
14
15        if (progress >= 1 || progress <= 0) {
16          //动画执行结束
17          _animationStatus = AnimationStatus.completed;
18          progress = progress.clamp(0, 1);
19        }
20      }
21       //标记为需要重绘
22      markNeedsPaint();
23      _lastTimeStamp = timeStamp.inMilliseconds;
24    });
25  } else {
26    _lastTimeStamp = null;
27  }
28}
响应点击事件
根据之前事件处理相关章节的介绍,如果我们要让渲染对象能处理事件,则它必须能通过命中测试,之后才能在 handleEvent 方法中处理事件,所以我们需要添加如下代码:
1// 必须置为true,确保能通过命中测试
2bool hitTestSelf(Offset position) => true;
3
4// 只有通过命中测试,才会调用本方法,我们在手指抬起时触发事件即可
5
6void handleEvent(PointerEvent event, covariant BoxHitTestEntry entry) {
7 if (event.down) {
8 pointerId = event.pointer;
9 } else if (pointerId == event.pointer) {
10 // 手指抬起时触发回调
11 onChanged?.call(!value);
12 }
13}动画调度抽象 RenderObjectAnimationMixin
我们可以看到,在RenderObject 中调度动画还是比较复杂的,为此我们抽象了一个 RenderObjectAnimationMixin,如果还有其它 RenderObject 中需要执行动画,可以直接复用。
1mixin RenderObjectAnimationMixin on RenderObject {
2 double _progress = 0;
3 int? _lastTimeStamp;
4
5
6
7 // 动画时长,子类可以重写
8 Duration get duration => const Duration(milliseconds: 200);
9 AnimationStatus _animationStatus = AnimationStatus.completed;
10 // 设置动画状态
11 set animationStatus(AnimationStatus v) {
12 if (_animationStatus != v) {
13 markNeedsPaint();
14 }
15 _animationStatus = v;
16 }
17
18 double get progress => _progress;
19 set progress(double v) {
20 _progress = v.clamp(0, 1);
21 }
22
23
24 void paint(PaintingContext context, Offset offset) {
25 doPaint(context, offset); // 调用子类绘制逻辑
26 _scheduleAnimation();
27 }
28
29 void _scheduleAnimation() {
30 if (_animationStatus != AnimationStatus.completed) {
31 SchedulerBinding.instance!.addPostFrameCallback((Duration timeStamp) {
32 if (_lastTimeStamp != null) {
33 double delta = (timeStamp.inMilliseconds - _lastTimeStamp!) /
34 duration.inMilliseconds;
35
36 //在特定情况下,可能在一帧中连续的往frameCallback中添加了多次,导致两次回调时间间隔为0,
37 //这种情况下应该继续请求重绘。
38 if (delta == 0) {
39 markNeedsPaint();
40 return;
41 }
42
43 if (_animationStatus == AnimationStatus.reverse) {
44 delta = -delta;
45 }
46 _progress = _progress + delta;
47 if (_progress >= 1 || _progress <= 0) {
48 _animationStatus = AnimationStatus.completed;
49 _progress = _progress.clamp(0, 1);
50 }
51 }
52 markNeedsPaint();
53 _lastTimeStamp = timeStamp.inMilliseconds;
54 });
55 } else {
56 _lastTimeStamp = null;
57 }
58 }
59
60 // 子类实现绘制逻辑的地方
61 void doPaint(PaintingContext context, Offset offset);
62}CustomCheckbox 的完整源码
则最终 CustomCheckbox 的完整源码为
1class CustomCheckbox extends LeafRenderObjectWidget {
2 CustomCheckbox({
3 Key? key,
4 this.strokeWidth = 2.0,
5 this.value = false,
6 this.strokeColor = Colors.white,
7 this.fillColor = Colors.blue,
8 this.radius = 2.0,
9 this.onChanged,
10 }) : super(key: key);
11
12 final double strokeWidth; // “勾”的线条宽度
13 final Color strokeColor; // “勾”的线条宽度
14 final Color? fillColor; // 填充颜色
15 final bool value; //选中状态
16 final double radius; // 圆角
17 final ValueChanged<bool>? onChanged; // 选中状态发生改变后的回调
18
19
20 RenderObject createRenderObject(BuildContext context) {
21 return RenderCustomCheckbox(
22 strokeWidth,
23 strokeColor,
24 fillColor ?? Theme.of(context).primaryColor,
25 value,
26 radius,
27 onChanged,
28 );
29 }
30
31
32 void updateRenderObject(context, RenderCustomCheckbox renderObject) {
33 if (renderObject.value != value) {
34 renderObject.animationStatus =
35 value ? AnimationStatus.forward : AnimationStatus.reverse;
36 }
37 renderObject
38 ..strokeWidth = strokeWidth
39 ..strokeColor = strokeColor
40 ..fillColor = fillColor ?? Theme.of(context).primaryColor
41 ..radius = radius
42 ..value = value
43 ..onChanged = onChanged;
44 }
45}
46// 动画调度相关逻辑直接 with RenderObjectAnimationMixin即可
47class RenderCustomCheckbox extends RenderBox with RenderObjectAnimationMixin {
48 bool value;
49 int pointerId = -1;
50 double strokeWidth;
51 Color strokeColor;
52 Color fillColor;
53 double radius;
54 ValueChanged<bool>? onChanged;
55
56 RenderCustomCheckbox2(this.strokeWidth, this.strokeColor, this.fillColor,
57 this.value, this.radius, this.onChanged) {
58 progress = value ? 1 : 0;
59 }
60
61
62 bool get isRepaintBoundary => true;
63
64 //背景动画时长占比(背景动画要在前40%的时间内执行完毕,之后执行打勾动画)
65 final double bgAnimationInterval = .4;
66
67
68 void doPaint(PaintingContext context, Offset offset) {
69 Rect rect = offset & size;
70 _drawBackground(context, rect);
71 _drawCheckMark(context, rect);
72 }
73
74 void _drawBackground(PaintingContext context, Rect rect) {
75 Color color = value ? fillColor : Colors.grey;
76 var paint = Paint()
77 ..isAntiAlias = true
78 ..style = PaintingStyle.fill //填充
79 ..strokeWidth
80 ..color = color;
81
82 // 我们对矩形做插值
83 final outer = RRect.fromRectXY(rect, radius, radius);
84 var rects = [
85 rect.inflate(-strokeWidth),
86 Rect.fromCenter(center: rect.center, width: 0, height: 0)
87 ];
88 var rectProgress = Rect.lerp(
89 rects[0],
90 rects[1],
91 min(progress, bgAnimationInterval) / bgAnimationInterval,
92 )!;
93
94 final inner = RRect.fromRectXY(rectProgress, 0, 0);
95 // 画背景
96 context.canvas.drawDRRect(outer, inner, paint);
97 }
98
99 //画 "勾"
100 void _drawCheckMark(PaintingContext context, Rect rect) {
101 // 在画好背景后再画前景
102 if (progress > bgAnimationInterval) {
103
104 //确定中间拐点位置
105 final secondOffset = Offset(
106 rect.left + rect.width / 2.5,
107 rect.bottom - rect.height / 4,
108 );
109 // 第三个点的位置
110 final lastOffset = Offset(
111 rect.right - rect.width / 6,
112 rect.top + rect.height / 4,
113 );
114
115 // 我们只对第三个点的位置做插值
116 final _lastOffset = Offset.lerp(
117 secondOffset,
118 lastOffset,
119 (progress - bgAnimationInterval) / (1 - bgAnimationInterval),
120 )!;
121
122 // 将三个点连起来
123 final path = Path()
124 ..moveTo(rect.left + rect.width / 7, rect.top + rect.height / 2)
125 ..lineTo(secondOffset.dx, secondOffset.dy)
126 ..lineTo(_lastOffset.dx, _lastOffset.dy);
127
128 final paint = Paint()
129 ..isAntiAlias = true
130 ..style = PaintingStyle.stroke
131 ..color = strokeColor
132 ..strokeWidth = strokeWidth;
133
134 context.canvas.drawPath(path, paint..style = PaintingStyle.stroke);
135 }
136 }
137
138
139 void performLayout() {
140 // 如果父组件指定了固定宽高,则使用父组件指定的,否则宽高默认置为 25
141 size = constraints.constrain(
142 constraints.isTight ? Size.infinite : Size(25, 25),
143 );
144 }
145
146 // 必须置为true,否则不可以响应事件
147 bool hitTestSelf(Offset position) => true;
148
149 // 只有通过点击测试的组件才会调用本方法
150
151 void handleEvent(PointerEvent event, covariant BoxHitTestEntry entry) {
152 if (event.down) {
153 pointerId = event.pointer;
154 } else if (pointerId == event.pointer) {
155 // 判断手指抬起时是在组件范围内的话才触发onChange
156 if(size.contains(event.localPosition)) {
157 onChanged?.call(!value);
158 }
159 }
160 }
161}测试代码如下:我们创建三个大小不同的复选框,点击其中任意一个,另外两个复选框的状态也会跟着联动:
1class CustomCheckboxTest extends StatefulWidget {
2 const CustomCheckboxTest({Key? key}) : super(key: key);
3
4
5 State<CustomCheckboxTest> createState() => _CustomCheckboxTestState();
6}
7
8class _CustomCheckboxTestState extends State<CustomCheckboxTest> {
9 bool _checked = false;
10
11
12 Widget build(BuildContext context) {
13 return Center(
14 child: Column(mainAxisAlignment: MainAxisAlignment.center,
15 children: [
16 CustomCheckbox2(
17 value: _checked,
18 onChanged: _onChange,
19 ),
20 Padding(
21 padding: const EdgeInsets.all(18.0),
22 child: SizedBox(
23 width: 16,
24 height: 16,
25 child: CustomCheckbox(
26 strokeWidth: 1,
27 radius: 1,
28 value: _checked,
29 onChanged: _onChange,
30 ),
31 ),
32 ),
33 SizedBox(
34 width: 30,
35 height: 30,
36 child: CustomCheckbox(
37 strokeWidth: 3,
38 radius: 3,
39 value: _checked,
40 onChanged: _onChange,
41 ),
42 ),
43 ],
44 ),
45 );
46 }
47
48 void _onChange(value) {
49 setState(() => _checked = value);
50 }
51}总结
本节演示了如何通过自定义 RenderObject 的方式来进行UI绘制、动画调度和事件处理。